Microscopy and Mitosis
Microscopy
The light microscope uses light to magnify objects up to 1,500x their actual size. They have a resolution of approximately 0.2 μm which isn’t large enough to visualise any of the smaller organelles, such as ribosomes and lysosomes. They are more commonly used for visualising whole cells or tissues. An advantage of light microscopy is that it can visualise living cells so we can watch behaviours such as cell division in real time.
The transmission electron microscope (TEM) is more powerful than a light microscope and has a high enough resolution (around 0.0002 μm) to visualise individual organelles. A TEM uses electromagnets to focus a beam of electrons at a sample. Electrons have a much shorter wavelength compared to visible light which means higher-resolution, detailed images can be produced. A disadvantage of TEM is that the sample needs to be fixed and placed in a vacuum, which means that live cells cannot be used.
The scanning electron microscope (SEM) has a lower resolution (around 0.002 μm) than the TEM but they can produce 3D images of cells and organelles. They emit a beam of electrons towards a sample, knocking electrons off it which are used to build an image. Like TEMs, SEMs cannot be used with live cells. Both types of electron microscope are pretty big and expensive so you’ll only find them in specialised research facilities and hospitals.
| Light microscope | TEM | SEM | |
| Maximum magnification | 1,500 x | 1,000,000 x | 500,000 x |
| Maximum resolution | 0.2 um | 0.0002 um | 0.002 um |
Magnification
Magnification is how enlarged the image is compared to the original object. Resolution is defined as how well a microscope distinguishes between two points that are close together (i.e. how much detail it can make out). Light microscopes have a much lower resolution, so produce less detailed images, compared to electron microscopes.
You can work out the magnification of a specimen viewed under a microscope using the equation:

Let’s say we magnify a 2 μm bacterial cell to form an image which is 16 cm long. The magnification we must have used is:
Convert both into the same units. 16 cm = 160 mm = 160,000 μm
160,000 / 2 = 80,000 x magnification
Calibrating the eyepiece graticule and the stage micrometer

If you wanted to measure the size of your specimen, you’ll first need to align the eyepiece graticule and the stage micrometer which are little rulers which are found on the lens and the stage respectively. To do the calibration you need to carry out the following steps:
Place the stage micrometer on the stage and focus the lens so that you can clearly see the divisions.
Align the eyepiece graticule with the stage micrometer.
Each division of the stage micrometer is 0.1 mm. If the eyepiece graticule spans a total of three divisions, then we know that the total length of the eyepiece graticule is 0.2 mm.
The graticule is divided by a scale from 0 to 100, which means that each individual division is a length of 0.002 mm.
Now we can take away the stage micrometer and add our sample, using the eyepiece graticule to measure its size.
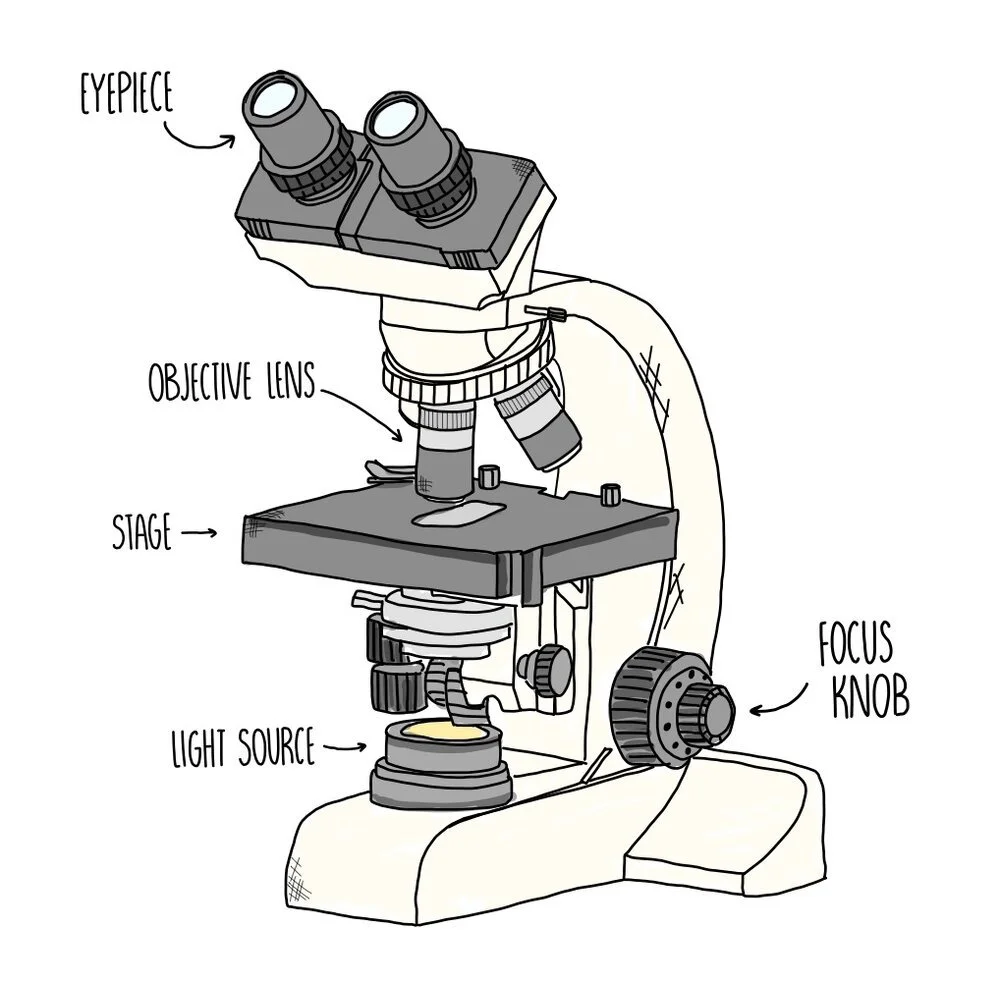
Viewing specimens under an optical microscope
Pipette a drop of water onto a microscope slide then place your specimen on top (this needs to be just a thin layer of cells so that light can pass through).
Add a drop of stain e.g. oesin stains the cell’s cytoplasm. This creates contrast and enables organelles to be visualised.
Add a cover slip to protect the specimen by carefully tilting and lowering down, taking care not to trap any air bubbles.
Place the slide onto the microscope stage and select the lowest-powered objective lens.
Look down the eyepiece and use the coarse adjustment knob to focus the specimen.
Select increasingly higher magnifications until you can visualise the cell structures you’re interested in.
Cell fractionation
Cell fractionation is a technique which separates organelles according to their density - you might want to do this if you want to visualise certain organelles under the microscope separately. It involves bursting the cell surface membrane to release the organelles and spinning the cell solution at really high speeds.
Homogenisation - the first step of cell fractionation is homogenisation. This is where you break apart the plasma membrane to release the organelles. This can be done by vibrating the cells or by breaking them apart in a blender. It is important that this cells are placed into a solution which is ice-cold, isotonic and buffered.
Ice-cold - the solution needs to be ice-cold to slow down the activity of enzymes. This is important because some enzymes will degrade organelles (such as the enzymes found inside lysosomes) so we need to reduce their activity to preserve the cell’s organelles.
Isotonic - the solute concentration (and therefore water potential) of the solution needs to be the same as the cells that have been broken down, otherwise water would move into the organelles by osmosis, resulting in damage
Buffered - adding a buffer to a solution ensures the pH stays constant. This is important because proteins are denatured by changes in pH - remember that proteins are a key component of various organelles.
Filtration - the homogenised solution is filtered to remove any tissue debris. The organelles are small enough to pass through the holes of the filter paper so will be present in the filtrate.
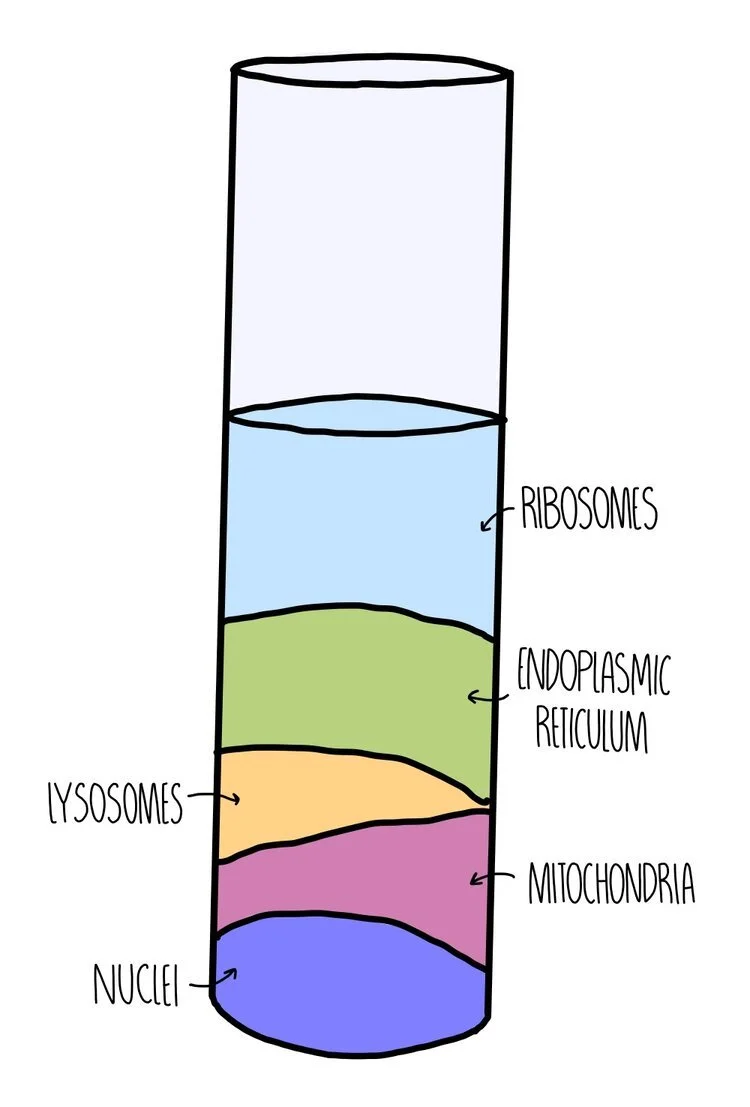
Ultracentrifugation - this is where we spin the filtrate at increasing speeds. The heaviest organelles will sink to the bottom of the test-tube, forming a pellet. We can transfer the remaining solution (the supernatant) to a separate test tube, which will be spun at a slightly higher speed. This is repeated until you obtain the organelle that you want. Remember that the organelles will be separated from the solution from the heaviest to the lightest. Nuclei will come out of the solution first, followed by mitochondria, then lysosomes, then the endoplasmic reticulum. Ribosomes will be the last organelles to form a pellet, since these are the lightest organelles in a cell.
Mitosis and the Cell Cycle
Mitosis is a type of cell division where cells produce identical copies of themselves and is used for growth and repair and asexual reproduction. It differs from meiosis, which is the type of cell division used to produce gametes.
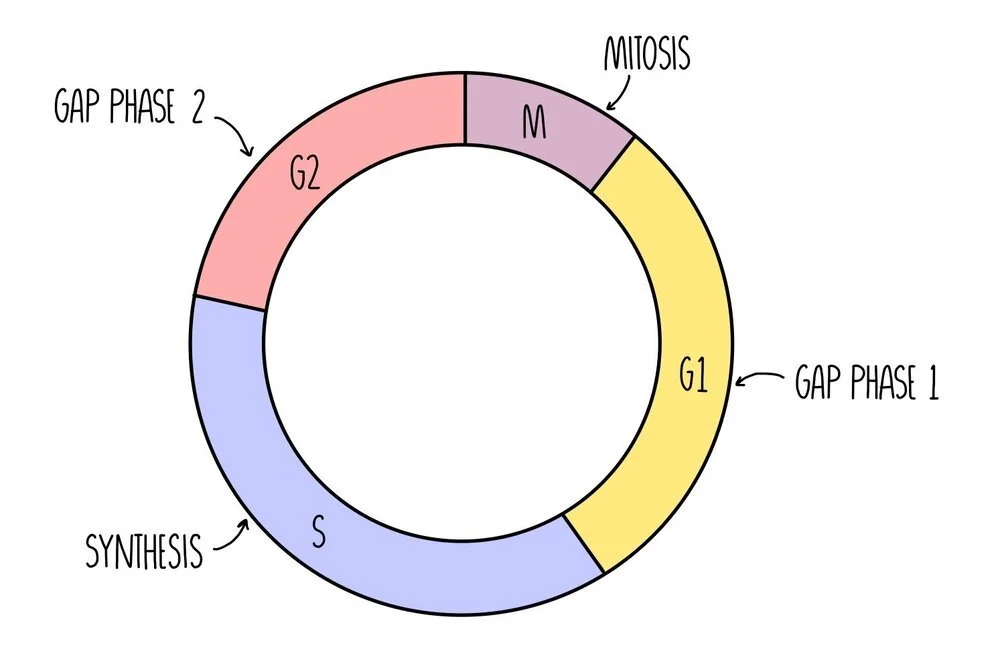
Mitosis occurs as part of the cell cycle which consists of four distinct phases. First, interphase takes place which is made up of three growth phases (called G1 phase, S phase and G2 phase), followed by mitosis.
Gap Phase 1 (G1) - cell grows bigger and replicates its organelles. A high amount of protein synthesis is taking place in order to build new organelles.
Synthesis Phase (S) - the cell replicates its DNA
Gap Phase 2 (G2) - the cell keeps growing until all of the organelles have duplicated.
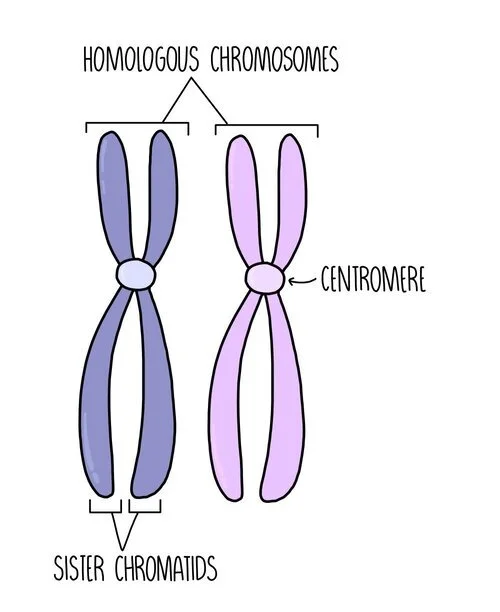
Once the DNA has replicated, each chromosome now consists of two sister chromatids, connected by a structure called the centromere. The mitochondria produce more ATP which will provide the energy for cell division and the ribosomes will be synthesising a high level of proteins to replicate organelles.
There are two ‘checkpoints’ in the cell cycle - one before S phase and one straight after S phase. During these checkpoints, the cell is checking its DNA for errors. This minimises the chances of duplicating any mutated DNA into the replicated cell.
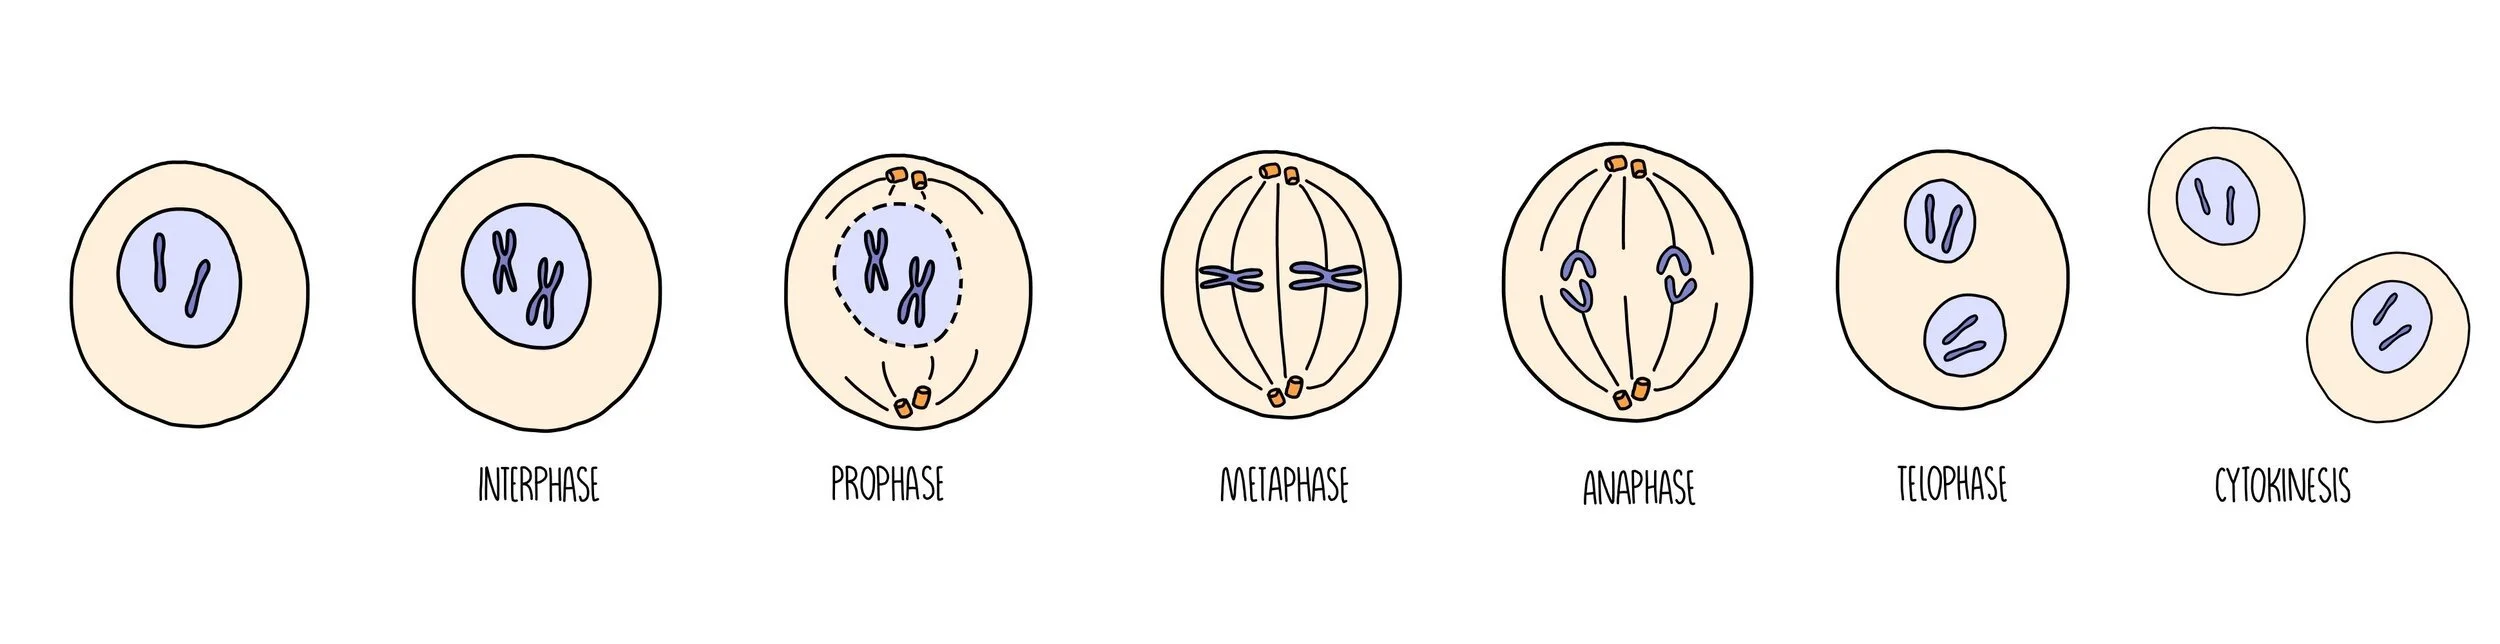
The Stages of Mitosis
Mitosis can be divided into a series of stages depending on what’s going on with the chromosomes in the cell. You can use the acronym PMAT (pass me another tequila) to help you remember the order.
Prophase - the chromosomes condense (they become shorter and fatter) and the nuclear envelope disintegrates. The centrioles move to opposite poles of the cell and form spindle fibres.
Metaphase - the chromosomes line up along the middle of the cell. They attach to the spindle fibre by their centromere.
Anaphase - the centromere splits and the chromatids are pulled to opposite poles of the cell.
Telophase & cytokinesis - the two groups of chromsomes decondense (they become long and thin) and a nuclear envelope reforms around them, forming two new nuclei. The cytoplasm divides (cytokinesis) and the plasma membrane pinches off to form two new, genetically-identical cells.
Cancer = uncontrolled mitosis
Mitosis is genetically controlled and stops once the cell has divided enough times to make the cells that you need. If the genes that control mitosis mutate, mitosis can occur unchecked, resulting in the formation of a tumour. If this invades the surrounding tissue, this leads to cancer.
Some cancer drugs work by disrupting the cell cycle to kill the tumour cells:
Some prevent the synthesis of enzymes involved in DNA replication. This prevents the cell cycle progressing past S phase and the cell is forced to undergo apoptosis (programmed cell death).
Radiotherapy works by damaging DNA using radiation. The cell cycle is stalled during the DNA checkpoint stages (either before or immediately after interphase). Prolonged pausing of the cell cycle causes the cell to initiate apoptosis.
The problem is that they have the same effect on healthy cells, which is why chemotherapy produces such unpleasant side-effects.
Mitotic Index
The mitotic index is a measure of the proportion of cells which are undergoing mitosis. You may be asked to calculate it in the exam. To do this, you need to count the number of cells with visible chromosomes and divide this by the total number of cells.

Investigating mitosis in squashed root tips
You can see mitosis happening in root tip cells by staining the chromosomes and observing under the microscope. We use cells right from the tips of the roots because this is where mitosis is taking place (in the meristem tissue).
Method:
Cut a thin section of tissue from the tip of a growing root.
Pipette a set volume of 1M hydrochloric acid into a boiling tube and place in a 60oC water bath.
Place the plant tissue in the boiling tube and leave for five minutes.
Rinse the root tip with cold water and dry using a paper towel.
Cut the root tip so that you have a thin layer of cells (about 2 mm) and spread out onto a microscope slide using a mounted needle.
Add a drop of Toluidine blue O stain to the tissue and place a cover slip on top. Push down on the cover slip to squash the cells and allow light to pass through. Be careful not to push sideways otherwise the chromosomes will become damaged.
Use a light microscope to visualise the cells and identify the stages of mitosis. Any cells with visible chromosomes will be undergoing mitosis (as the chromosomes are condensed).