Plant Resources
Plant organelles
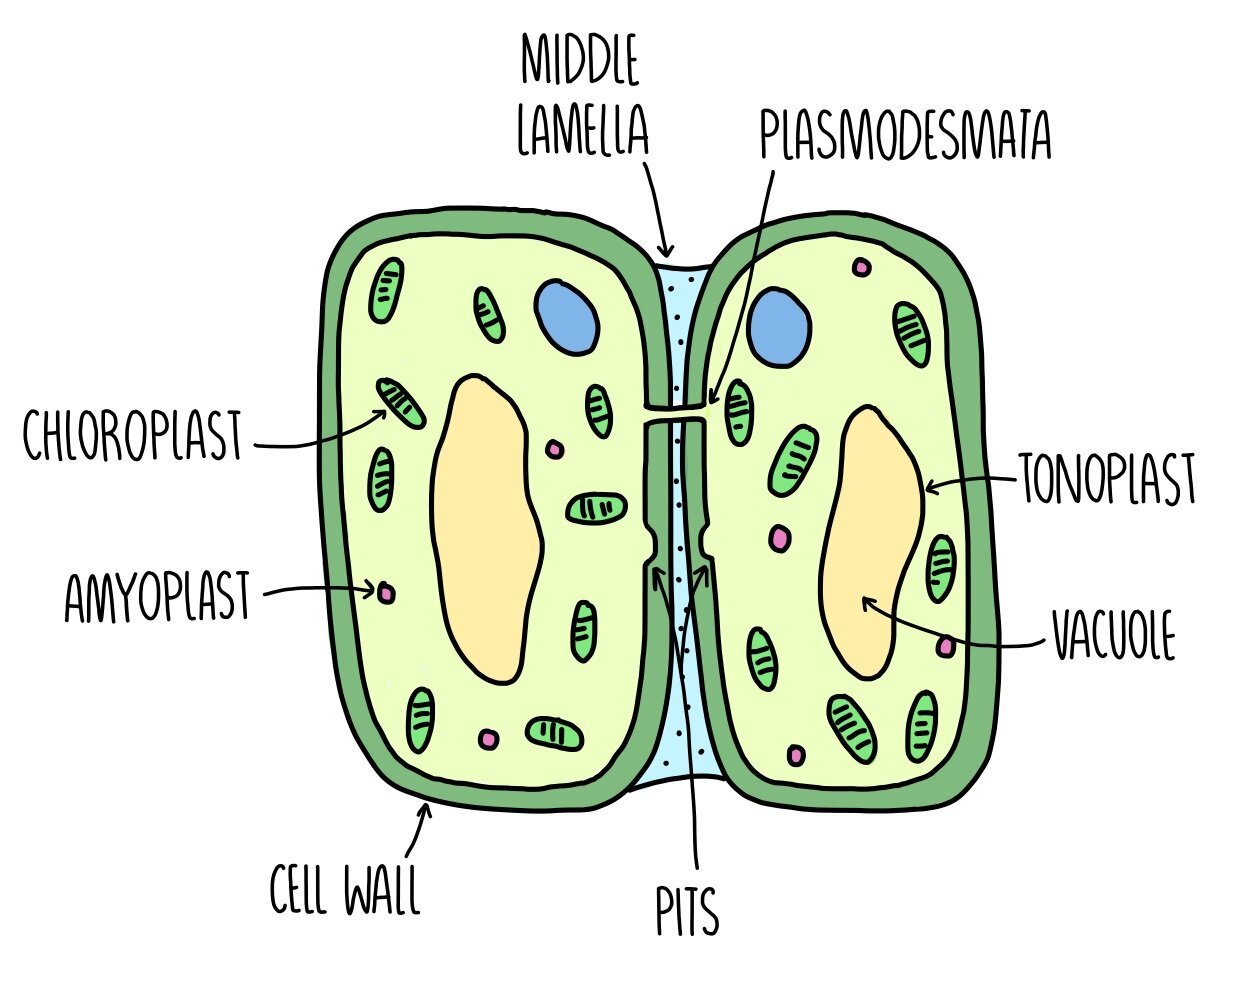
Cell wall - a rigid structure made of cellulose which provides support to the cell.
Middle lamella - the middle lamella is found outside of the cell walls in plant cells. It is responsible for sticking plant cells together and providing stability. It is mostly made of a substance called calcium pectate.
Amyloplasts - these are plant storage granules which contain starch and are mostly found in bulbs and tubers. Amyloplasts can convert the starch back into glucose when the plant cell needs more glucose for respiration.
Vacuole - the vacuole is an organelle which stores cell sap and may also store nutrients and proteins. It helps to keep plant cells turgid. Some vacuoles can perform a similar function to lysosomes and digest large molecules.
Tonoplast - the tonoplast is a membrane which surrounds the vacuole which functions to separate the vacuole from the rest of the cell.
Plasmodesmata - plasmodesmata are narrow channels of cytoplasm within the cell walls of plants. It allows two neighbouring plant cells to transport substances between them and to communicate.
Pits - pits are regions of a plant cell where the cell wall becomes very thin. Pits are arranged in pairs so that the pit of one plant cell is aligned with the pit of another plant cell. Like plasmodesmata, pits allow neighbouring plant cells to exchange substances.
Vascular bundles
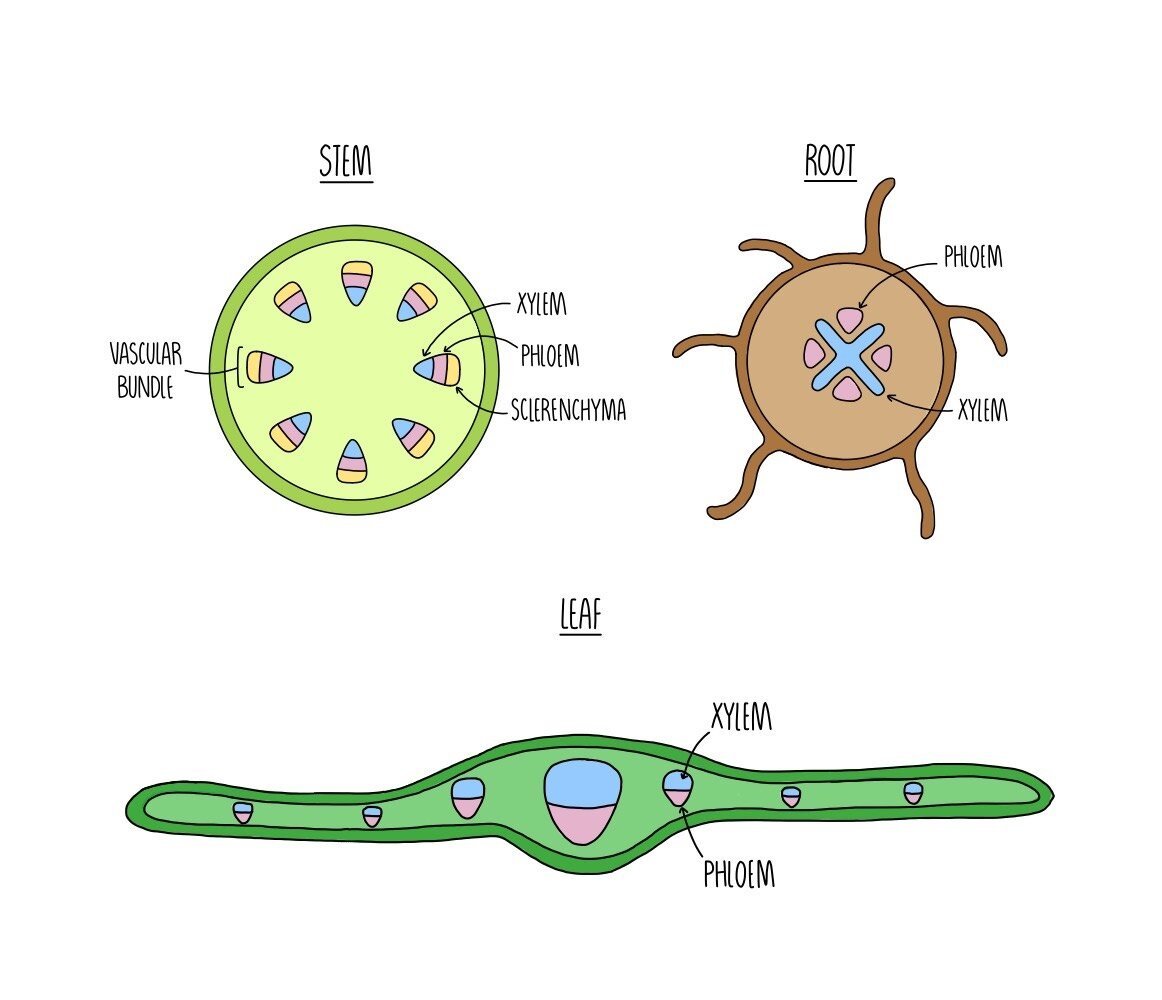
Plants contain vessels which function to transport water and sugars from one part of the plant to another. Xylem vessels transport water and dissolved mineral ions from the roots to the rest of the plant and also provide structural support. Phloem vessels transport dissolved substances, such as sucrose and amino acids, from the leaves to the rest of the plant. Xylem and phloem vessels are grouped together within the plant stem and form vascular bundles. Sclerenchyma fibres are also found within vascular bundles and provide support to the stem.
Within the plant stem, xylem vessels are found right on the inside. Phloem tissue is located in the middle of the vascular bundle and sclerenchyma fibres are found on the outside. Having the stronger xylem vessels in the centre provides strength to the stem and acts like an internal ‘scaffolding’ to support the stem and prevent it from bending in the wind.
In the root, the xylem forms a cross-like structure in the centre which is surrounded by phloem vessels. This arrangement adds strength to the root as it pushed through the soil.
Within the leaf, the xylem vessels are found towards the top of the vascular bundle with the phloem vessels found underneath.
Xylem

Xylem vessels transport water and mineral ions from the roots to the rest of the plant.
They are made up of dead, hollow cells with no end cell walls. This forms one continuous tube when the xylem cells are stacked on top of each other. The cells have no organelles or cytoplasm, which creates more space inside the vessel for transporting water.
The cell walls contain pits which allow water and mineral ions to move into and out of the vessel. The cell wall also contains a tough, woody substance called lignin, which strengthens the xylem vessel and provides structure and support to the plant.
Phloem

Phloem vessels transport dissolved substances, such as sucrose and amino acids from parts of the plant where they are made (sources) to the parts of the plant where they are used (sinks). Leaves are sources because they produce glucose from photosynthesis and parts of the plant where sugar is stored, such as roots and bulbs, act as sinks.
Phloem vessels are made up of two types of cell - sieve tube elements and companion cells. The sieve tube elements are living cells and are joined end-to-end to form sieve tubes. The ends of each cell consist of a ‘sieve plate’ which contains lots of holes to allow solutes to move from one cell to the next. The sieve tube cells contain no organelles and very little cytoplasm to create more space for solutes to be transported. The absence of a nucleus and other organelles means that these cells cannot survive on their own, so each sieve tube element is associated with a companion cell, which contains a nucleus and is packed full of mitochondria. The mitochondria provide lots of energy for the active loading of sucrose into the sieve tube element. The sieve tube element and the companion cell are connected through plasmodesmata (channels in the cell wall) which allow the two cells to communicate.
Sclerenchyma
Together with xylem and phloem vessels, sclerenchyma fibres are also found within vascular bundles and provide structural support to the plant. They are made up of bundles of long, dead cells. The cells have a hollow lumen and the cell walls are thickened with lignin. The cell walls also contain more cellulose than a typical plant cell which makes sclerenchyma fibres particularly strong.
Dissecting Plant Stems
To view vascular bundles under the microscope, you first need to dissect the plant stem and prepare a tissue sample. You would do this by following the method below:
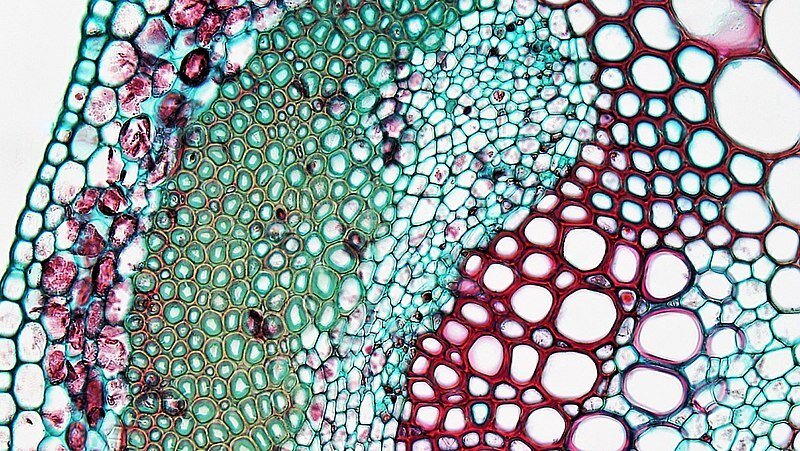
Vascular bundle in a clover leaf viewed under the microscope. Image credit: Berkshire Community College Bioscience Image Library.
Cut a thin section of the plant stem using a scalpel. Take care when using the sample and remember to cut away from you.
Place the tissue sample into water to prevent it from drying out.
Place the tissue sample into a small dish containing the stain. A common stain that is used to view vascular bundles is toluidine blue O (TBO) which stains lignin blue/green which will enable you to visualise the xylem and sclerenchyma fibres. The phloem cells and remaining tissue will appear a pink/purple colour.
Rinse the tissue samples in water and place each one onto a microscope slide.
Plant fibres
Plant fibres, such as cotton and hemp, are made up of long tubes of plant cells. Plant fibres are strong which makes them useful for materials such as rope or sacks. Their strength is due to two factors:
The arrangement of cellulose microfibrils in the cell wall
The secondary thickening of cell walls with lignin
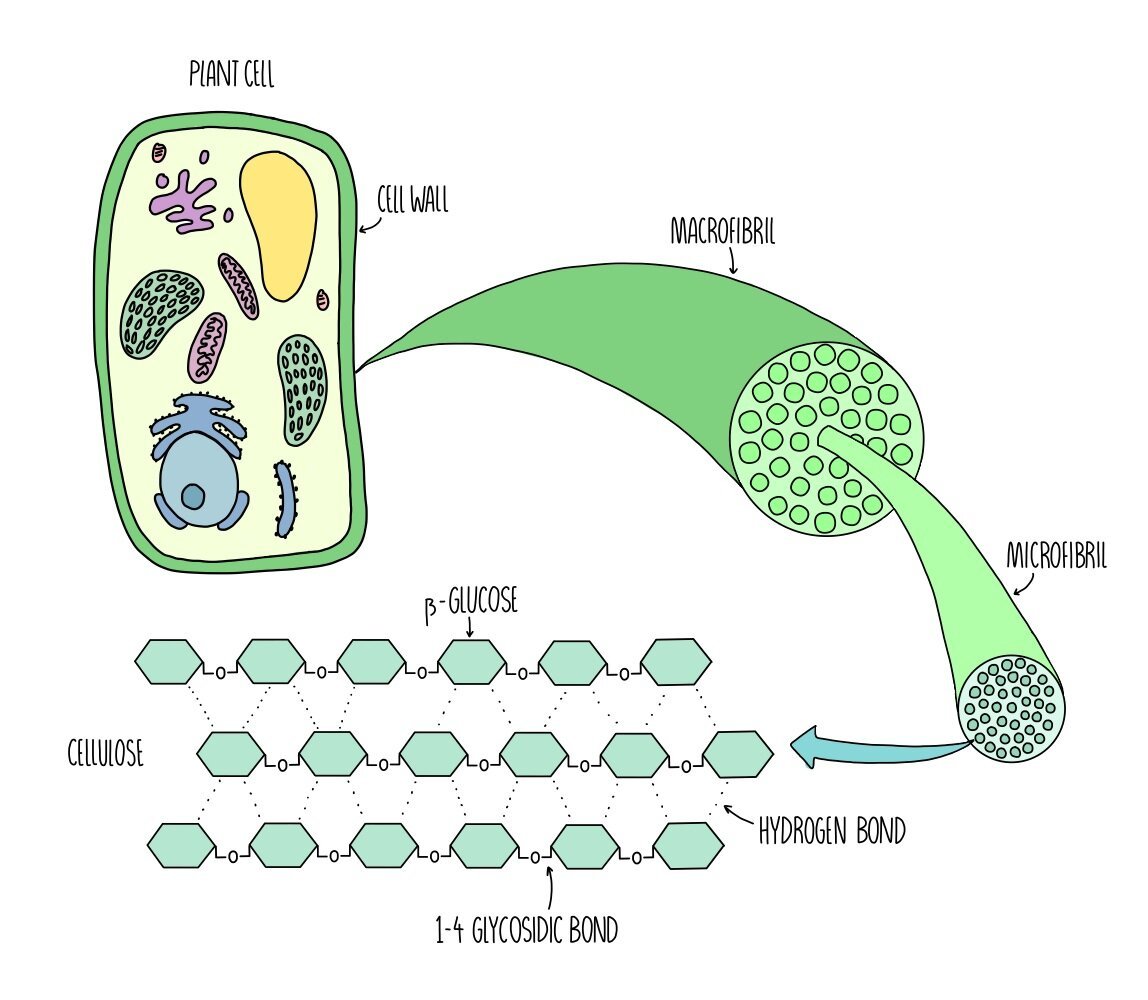
Cellulose microfibrils
Cellulose is a polysaccharide made up of long chains of beta-glucose monomers joined by 1-4 glycosidic linkages. Cellulose molecules are unbranched but are bonded to each other through hydrogen bonds. This bonding between cellulose molecules forms a net-like arrangement called a microfibril. Microfibrils are in turn hydrogen bonded to other microfibrils to form larger structures called macrofibrils. The net-like arrangement and the strength of the cellulose microfibrils are what make plant fibres so strong.
Lignin
Lignin is a thick, woody substance which is found in the cell walls of xylem and schlerenchyma cells and provides strength to the plant stem. Lignin forms during a process called secondary thickening - this is when xylem and schlerenchyma cells which have finished growing produce a secondary cell wall between the normal cell wall and the cell membrane. This second cell wall is thicker than the first cell wall and contains a higher proportion of lignin. Secondary thickening is what makes the structural plant fibres (xylem and schlerenchyma vessels) so strong.
Measuring the Tensile Strength of Plant Fibres
Tensile strength is the amount of weight a plant fibre can take before it snaps. It is important to measure the tensile strength to avoid injury when using fibres in things like construction or sports - e.g. a rock climber would need to know if the tensile strength of the rope they were using exceeded their body weight. You can measure the tensile strength of plant fibres using the following method:
Set up a clamp stand and attach the plant fibre that you’d like to measure. Tie a weight to the end of the fibre.
Add more weights, one at a time, until the plant fibre breaks. Record the mass of weights that the fibre was carrying before it snapped.
Repeat with different samples of the same fibre at least three times then calculate a mean.
In this experiment there are some variables that you’d need to keep the same (control variables). These include the length of the plant fibre, the temperature in the room and level of humidity. Safety measures to be considered are to stand away from the area below the weights to avoid them falling on your feet and wearing safety goggles to protect your eyes.
Sustainability
Materials such as rope and fabrics can be made out of plant fibres - but they can also be made out of plastics which are obtained fromfossil fuels. Although materials made out of plant fibres are weaker and don’t last as long, they are more sustainable. Sustainability is defined as the use of materials that meets the needs of the current generation and can be replenished so that the same resources are still available for future generations. Sustainable practices use renewable resources - these are resources which can be easily replaced and will never run out - as opposed to non-renewable resources such as fossil fuels which will one day vanish if we carry on using them. Plant fibres are a renewable resource because plants can be easily regrown for future generations.
Making materials from plant fibres as an alternative to plastics has other advantages:
Converting plants into fibres is a simpler and cheaper process than producing plastics from fossil fuels. This is especially important in developing countries since less technology and expertise are needed to produce the fibres.
Materials made from plant fibres are biodegradable whereas plastics are non-biodegradable and persist in the environment on landfill sites for hundreds of years.
Along with plant fibres (the xylem and schlerenchyma vessels), starch can also be used as a sustainable resource. Starch can be used to make bioplastics and biofuel. Making plastics and fuel from starch is more sustainable than making it from fossil fuels because less fossil fuel is used up and the crops from which the starch was extracted from can be regrown.
Plant minerals
Like humans, plants need certain mineral ions to stay healthy. These mineral ions are found in the soil and are absorbed by the plant through their roots. A lack of any one of these ions will result in a mineral ion deficiency and will result in the plant appearing discoloured, wilted and generally a bit under the weather.
Calcium ions - calcium is a component of plant cell walls (specifically, it is needed to form calcium pectate which is found in the middle lamella). A lack of calcium means that the plant won’t grow properly and will display stunted growth with dead, curling leaves.
Nitrate ions - nitrogen is needed for two very important biological molecules - amino acids and nucleotides. A lack of nitrate ions means that less DNA and protein is synthesised. This will affect a range of processes in the plant including:
Photosynthesis - translation of proteins such as chlorophyll and photosynthetic enzymes (e.g. Rubisco) will be reduced so less photosynthesis will take place. Leaves will turn yellow due to reduced chlorophyll production. The lack of glucose synthesised will result in reduced respiration, resulting in stunted growth.
Cell division - since cell division relies on DNA replication, nitrate deficiency will reduce cell division and growth. This will contribute to stunted growth and will also result in reduced seed and fruit production.
Magnesium ions - magnesium is required for chlorophyll production. This means that magnesium deficiency will result in less photosynthesis taking place, which means less glucose is available for respiration. Less ATP is produced, which is needed for cellular processes such as cell division. The plant will show stunted growth and yellowing leaves.
Water - water is needed for a number of processes. It is a component of the cytoplasm, where chemical reactions take place, and of the vacuole which keeps the cell turgid. It is also required for photosynthesis, hydrolysis reactions and to regulate temperature as the evaporation of water from leaves helps to cool the plant down.
Investigating plant mineral deficiencies
You can investigate the effect of different concentrations of mineral ions on plant growth in the lab by carrying out the following experiment:
Prepare a nutrient broth and add the same volume to three test tube. Add varying concentrations of mineral ions to each of the three test tubes.
Record the mass of three plant seedlings - these should all be of the same plant species and the same age. Place plant seedlings on top of each test tube so that their roots are suspended in the broth. You may need to support the seedling with some cotton wool to prevent it from falling into the test tube.
Cover the test tube in foil - this will prevent light from reaching the broth and facilitating the growth of other organisms such as algae.
Place the test tubes near a light source and leave to grow for a certain period of time (i.e. 1 week). Ensure the amount of light intensity each plant receives is the same. Other control variables include temperature and humidity.
Record the new mass of each plant and calculate the change in mass over the one week period.
Repeat the experiment at least three times and calculate the mean change in mass of the plants for each nutrient broth.
The seedling which shows the largest change in mass will be the one that was placed in a nutrient broth with the optimum concentration of mineral ions.
Preparing plant extracts for antimicrobial testing
Some plants, including garlic, mint and turmeric, contain natural antibiotic molecules and can inhibit the growth of microorganisms. There are loads of other plants in the world which haven’t been tested and may also have antimicrobial properties - this is one of the reasons why maintaining plant biodiversity is so important. These compounds can be extracted and used to manufacture antibiotic drugs.
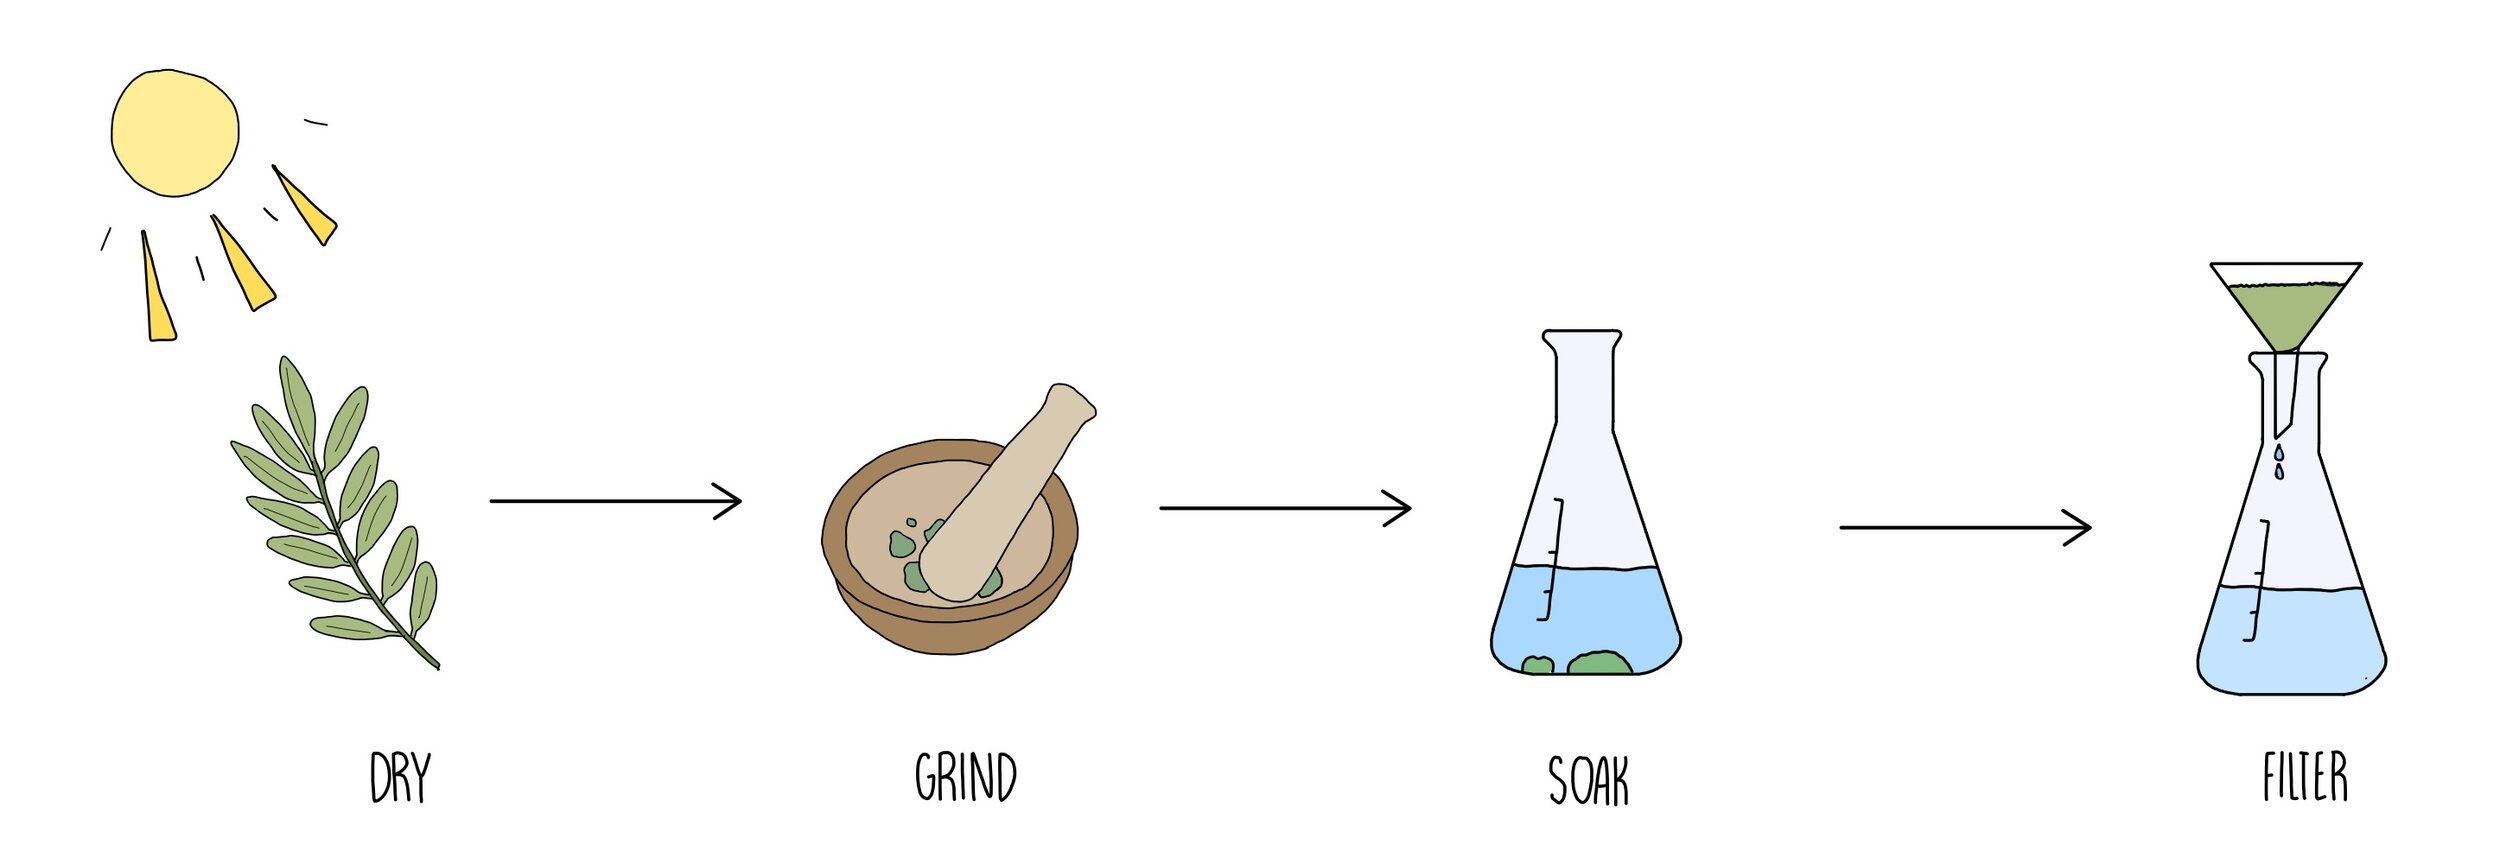
In order to test a plant for antimicrobial properties, you will first have to prepare a plant extract using the following method:
Dry out the plant by leaving in the sun until the water has evaporated out then grind using a pestle and mortar.
Soak the ground plant tissue in ethanol - this will extract the antimicrobial substances which are soluble in ethanol.
Filter the solution to remove the pieces of plant tissue. Keep the solution containing the dissolved plant extract.
Testing antibiotics
The efficiency of different antibiotics (or plant extracts containing antimicrobial substances) can be tested by soaking pieces of filter paper in the antibiotic solutions and placing on a Petri dish containing bacteria. The stronger the antibiotic, the more bacteria are killed. Regions of the Petri dish where bacteria have been killed will appear as a clear zone - the size of the clear zone is proportional to the strength of the antibiotic. The experiment is carried out by carrying out the steps below:
Prepare a nutrient broth containing bacteria and add the same volume of the broth to a series of Petri dishes.
Using a sterile plastic spreader, spread the bacterial broth evenly across the Petri dish. Remember to keep the lid on the Petri dish wherever possible.
Using sterile forceps, place a disc of filter paper into each antibiotic solution then place far apart on the Petri dish. It is important to keep all control variables (soaking time and size of the disc) the same for each antibiotic.
Incubate the Petri dishes at 25 oC for 24 - 48 hours. It is important that the temperature is not higher (anywhere around 37 oC) since this would pose the risk of growing human pathogens.
Measure the area or the diameter of each clear zone.
Repeat the experiment at least three times and calculate the mean area of the clear zone for each antibiotic.
Aseptic techniques
When carrying out experiments involving bacteria, it is important to carry out aseptic (sterile) techniques. This is because bacteria are everywhere - all over your hands, in your breath and covering the lab surface - and you don’t want cross-contamination to interfere with your results. Aseptic techniques include the following:
Use of sterile equipment - this can be done using a machine called an autoclave which looks like a dishwasher but uses steam and high pressure to sterilise the equipment.
Disinfect the lab bench and work surfaces.
Wear gloves.
Place a Bunsen burner near to your work space when transferring bacteria from one container to another. The heat from the flame draws any microorganisms in the air away from the work space because hot air rises.
Close windows and doors to prevent draughts blowing microbes towards you.

Digitalis lutea. Credit: Bernd Haynold (Wikipedia)
Historical drug testing
Back in the eighteenth century there wasn’t such thing as clinical trials and placebos - doctors had the power to give their patients whatever ‘cure’ they thought might work and hoped for the best. The classic example is that of William Withering, a doctor who in 1785 heard that one of his patients who had swollen tissues recovered after drinking a herbal remedy. He found out that the remedy contained foxglove extract (Digitalis) - the problem was that too little digitalis would be an ineffective treatment whereas too much would be fatal since foxgloves are poisonous. Not letting it worry him too much, he prepared a digitalis soup which a concentration he hoped would work and gave it to his patients. He varied the concentration he gave to each patient and used a crude method of trial and error to work out which was the optimum concentration.
Modern drug testing
Nowadays, drug testing is much more rigorous and (usually) safer than Withering’s deadly soup. Before a drug is available to the public, it must first be tested for toxicity on animals before undergoing three phases of testing.
Phase 1 - the drug is tested on a small group of healthy volunteers. This is to check for side effects and to establish a safe dosage.
Phase 2 - the drug is given to a larger group of people who have the disease that the drug is designed to target. The purpose of this phase is to check whether the drug actually works to reduce symptoms. Phase 2 trials will usually involve a placebo - this is an inactive substance which resembles the drug and is used to rule out any psychological benefits patients may have from believing they are receiving treatment. Phase 2 trials are often double-blind studies, which is when neither the patients nor the doctors know who is receiving the treatment and who is receiving the placebo, since the doctor’s expectations may influence the results and make the data biased.
Phase 3 - the drug is given to hundreds or thousands of patients in order to compare the drug to existing treatments. The patients are randomly split into two groups where one group receives the new drug and the other receives the best treatment currently available. Phase 3 trials can also involve a double-blind design where neither the patients nor the doctors know which patients are receiving the new treatment.
There are instances where it is unethical to use a placebo in a clinical trial. For example, if you were conducting a phase 2 trial of an anti-cancer drug, it would be unethical to give cancer patients an inert substance. In these cases, existing cancer treatments will be given to the control group.